Edit Component
Icon:

This feature is part of the SchematicEditor.
Description
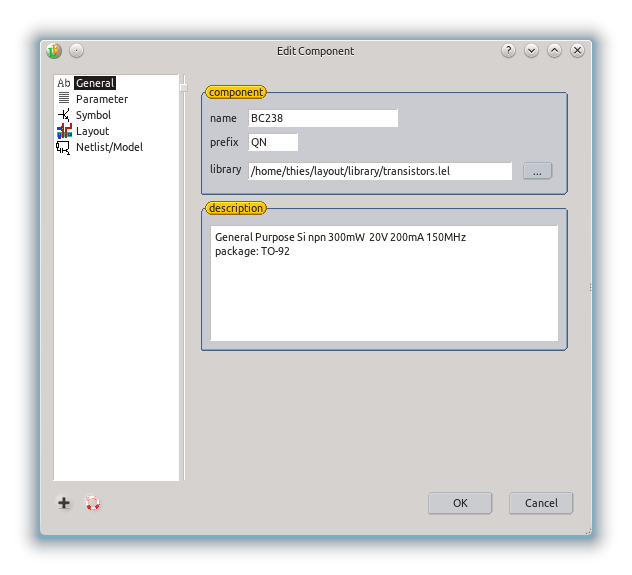 Opens a dialog to edit the selected component of the current library. The dialog includes a import button which will allow to import setting from Qucs, LTSpice, OpenAccess, ... . Supported library formats for import often not contain all required information. Missing senctions (e.g. layout information) had to be added by hand. The edit component dialog also contains a button remove. With that button you can remove that component from the library file. The component however will kept in memory so that is still available for opened schematic, but it will be invisible in the component list.
The editing of the component is spitted into five parts:
General
In the general section the component name, its library prefix for the device name is defined. A user description is also part of the section. That description may also include a hyper link. If it does, ComponentInfo will not open a message box with the description but open the link with a browser.
Any component belongs to a library. Its name and file path is also listed in this section. To move a component to a different library simple change the name of the library.
Parameter
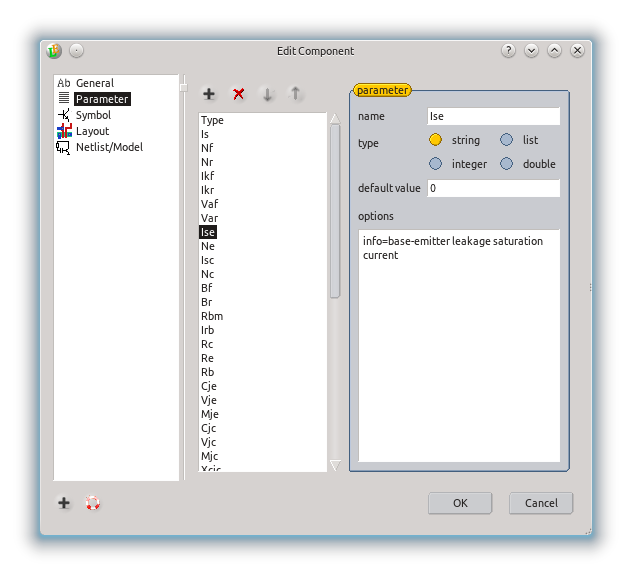 Here all parameter of the device are listed. In the middle your will find a list of an existing parameter. Above the list there are buttons to control the order of the parameter and to add or remove a parameter.
After clicking on one parameter its details are show on the right. Any parameter information can be edited including the parameter name and its type. Four different types are supported:
string |
a free text, which can freely be entered |
list |
predefined texts, will be shown as a combo box in the parameter dialog |
integer |
an integer number |
double |
a real or floating point number with double precision |
Any parameter has a default value, which can also be empty. A list parameter includes a list of all possible values.
Of any parameter options can be added. Supported options are:
- info: information show as tool tip during the parameter entry,
- callback: a layout or TCL macro which will be executed after changing the parameter. This can be used to perform a range check or to adjust calculated parameters,
- unit: the unit of the parameter. If will be displayed on the right of the parameter entry field,
- edit: if this option is false, the parameter can not be change by the user. It just can be changed by a callback macro and it is display to the user.
- display: if this option is false, the parameter is invisible in the parameter dialog,
- parse: iftrue the parameter will be parse. e.g. an entry of 4*8 will result in a 32 in the schematic,
- parseAsNum: if true this parameter is marked to be a number for further parameter processing,
- multiplier: if true this parameter will be used as muliplierer for the component in the layout (introduced with version 20141230).
Options had to be enter as option-name=option-value with one option per line.
Symbol
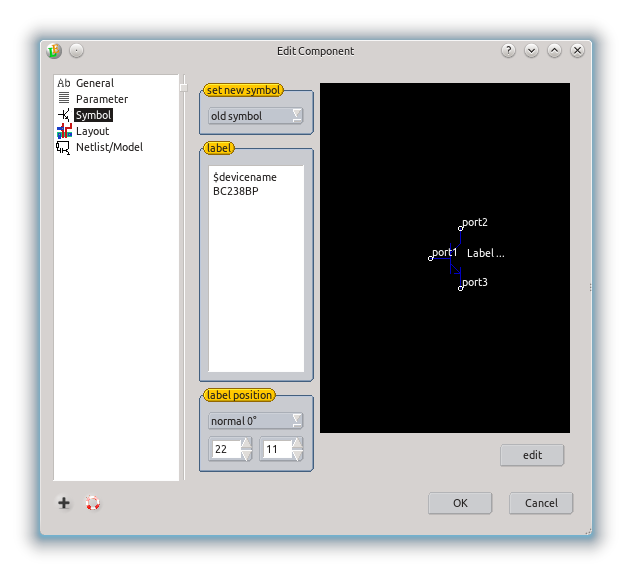 In the symbol part you can see and change the symbol of the component. To change the symbol you had to create the new symbol in a normal schematic sheet before editing the component. The symbol must only contain non functional parts and ports. Any used port will be used as a connection port for the edited symbol. If the new symbol is a schematic sheet with components a symbol will be automaticly created from it as a rectangle with all ports used in that sheet. With the Edit button in this section you can edit the current set symbol. A new sheet will be added with the current symbol. You need to close the dialog to be able to see it and need to call EditComponent again to set the modified symbol.
Beside the symbol the label of the symbol is defined in this section. The label can be any text. Word starting with a $ will be replaced by the relating parameter. The label position is also defined in this part of the dialog. The position of the label can be defined for different symbol orientations.
Example for a label:
$devicename
$w/$l
nf=$nf m=$mult
model=$model
Layout
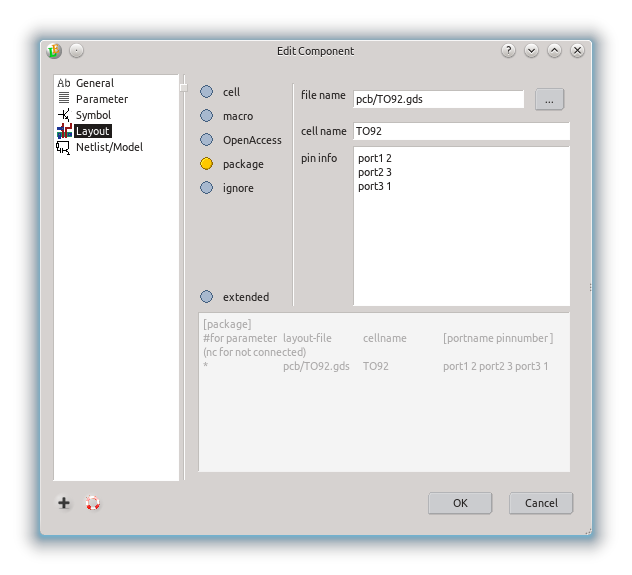 In the layout part of the dialog the layout generation from the component is described. To generate the layout the description is read line by line. As soon a line can be used to generate the layout that resulting layout will be used. Lines starting with a # are comments and will be ignored. There are five ways to describe a layout:
[ignore]
To ignore a component in the LayoutEditor use a ignore section in the layout description. This may be useful for simulation 'component' or power supplies. Any component fitting the condition will be ignored in the layout.
[ignore]
#condition
output=X1
output=X2
So this fist example will ignore the component, if the parameter output is equal to X1 or X2. Any other value of output will not handled in the example and will be processed by following lines of the layout section. To make a condition always true use a *. Like this example to always ignore the component in the layout:
[ignore]
#condition
*
[cell]
To use a existing cell for the component, list it under the cell section. In the example below the file openCellLibrary/AND3_X2.gds will be imported and the cell AND3_X2 will be used if the output parameter is equal to X2. If you want to use a cell in the already opened layout, use a . as filename
[cell]
# device-type                   file            cell
output=X1       openCellLibrary/AND3_X1.gds     AND3_X1
output=X2       openCellLibrary/AND3_X2.gds     AND3_X2
output=X4       openCellLibrary/AND3_X4.gds     AND3_X4
[package]
If the package section is used, also a cell will be used for the layout. But this cell will be edited and the cell will be renamed so that the cellname is unique to the used component. The editing of the cell is limited to modify text. So the text devicename is replace by the devicename to the component. Also type is replaced by the component name. Also pinnumber is replaced by portname. (or delete if prtname=nc) So in this example the text 3 is replace by in+ and the text 1 is removed. This section is very useful for printed circuit boards. So you only need a package layout design and can use it for any component with that package.
[package]
# part-type     layout-file     cellname [portname pinnumber ] (nc for not connected)
Package=SO8N    pcb/SO8N.gds    SO8N     in+ 3 in- 2 V+ 7 V- 4 out 6 nc 1 nc 5 nc 8
Package=DIP8    pcb/DIP8.gds    DIP8     in+ 3 in- 2 V+ 7 V- 4 out 6 nc 1 nc 5 nc 8
[macro]
Using the macro section will call a macro to create the layout design. The must set the cell to be used for the component as current cell. In the macro there will be added some defines like NETLIST_PARAMETER, NETLIST_DEVICENAME, NETLIST_PIN1_NAME, so that the macro have full access to all parameter of the component to generate. See some of the shipped library to get a plenty of example macros e.g. in ParametricShapeLibrary
[macro]
# device-type   macro-file              pins
*               pcb/resistor.layout     pin1 pin2
[oa]
With the oa section you can directly use a OpenAccess view for the device.
[oa]
#condition      lib     cell    view
*               pdk     nmos    layout
[external]
With the external section an external software is started to create the layout. The software tool is started with libraryname cellname and viewname as parameter. Further parameter are all paramter of the device in the format parametername=parametervalue.
[external]
#condition      lib     cell            view    tool
*               libname cellname        viwname software
The software tool outputs the layout information to the standard output. The format is an ascii text with one line fore each shape. Here an example of the format:
databaseunits 1.000000e-09
box 99 0 1000 1000 1600 1600
polygon 10 0 1000 1000 1200 1000 1000 1200 1000 1000
text 42 0 0 1200 1300 0 PLUS
If you need more information on the output format to create own external parametric cell tools, please contact the support.
Extraction
The previous section layout describes how a layout is created from the component. This section describe the other way round: How can the device be extracted from the layout. Devices placed via a schematic driven layout can always be detected as its component information is stored in the layout as properties information of the cell reference. That work even if nothing is described here. This section describes how to extract it without having such information. This can be used for parasitic parameter extraction or for a final design validation after removing all properies with schematic information.
The section has tree fields:
- method used for the extraction
- parameter for the extraction method
- parameter used for the extracted device
For details like avaiable extraction methods and its parameter please see ExtractionDevice. (introduced with version 20130101)
Netlist/Model
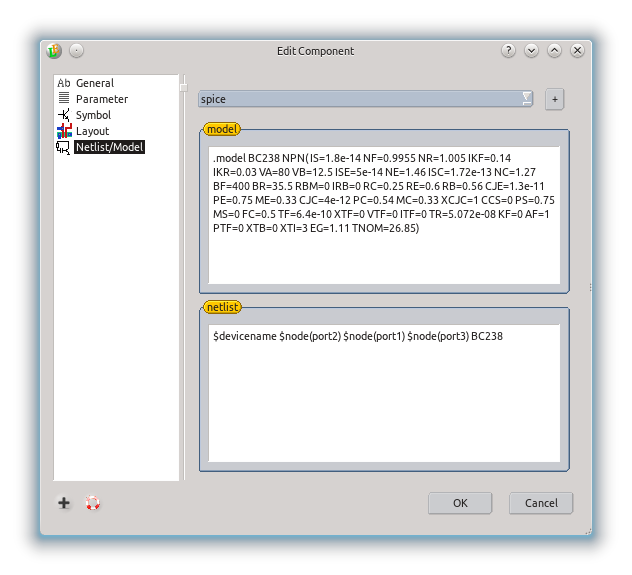
In this part of the dialog you can set some information to generate a netlist in any netlist format. Even new formats can be added. Each format has two parts: the netlist and the model part. These part will be included in the netlist by the commands $netlist(format) or $model(format) in the netlist generation setup. The pricipal difference of the two parts is that in the netlist part for each component placement in a schematic the data is added while in the model part only once for each type of component the relavant data is added. Please see NetlistGeneration for more details on the generation of a netlist or see the examples shipped with the SchematicEditor.
See also
CategoryFeature CategorySchematic CategoryFullVersion FeatureCode:4017
